
Hey, Daily Posters! For those of you who haven’t heard, we’re running our Zero to Hero challenge this month: 30 days of assignments to give you a solid blogging foundation (or to reintroduce tasks you might have skipped when you first started blogging). So, be sure to check it out — in today’s task, participants are asked to publish a post with at least one image, so today’s tutorial on cropping images might be helpful.
In our Photography 101 series, Leanne Cole talked about image editing in her Photoshop tutorial, covering tasks like straightening, cropping, and spot-correcting. Since cropping is a fairly simple yet effective way to improve a photograph, let’s talk a bit more about how you can cut and frame your images.
When I’m out with my iPhone or camera, I don’t always have time to carefully compose a shot, and if you sift through my image library, you’ll see multiple versions of one shot. Great photographs don’t just happen (though sometimes we do get lucky!). These days, you can use various editing tools to achieve a desired effect.
You don’t need Photoshop to edit your images — you can upload a photo into your WordPress.com dashboard, and then crop and edit it in your Media Manager. If you’re a mobile or touch device user, you can usually crop an image right after you’ve taken it, depending on your device or app (like Instagram or Adobe Photoshop Express for iOS). And if you’re looking for more tools, you can use beginner-friendly photo editors like PicMonkey, Pixlr, and Picasa.
Remember our “Grand” photo challenge? I received many kind comments on the featured photograph from Halong Bay, which I took as our boat floated toward a massive limestone gate. Here’s a variation of it — cropped, edited, and instagrammed:

Let’s use this scene to illustrate how cropping can drastically improve an image. Here’s the original shot:

The original uncropped version.
If you open an image in your Media Manager, you can select the crop tool to:
- Remove extraneous details and distracting lines, shapes, and objects (such as a person’s elbow and yellow life jacket).
- Change the shape of your canvas (from a vertical composition to a square).
- Force a new frame or composition (make a wall of rocks more prominent, even imposing).
- Direct or change the subject matter of a scene (make a small boat the ultimate focal point).
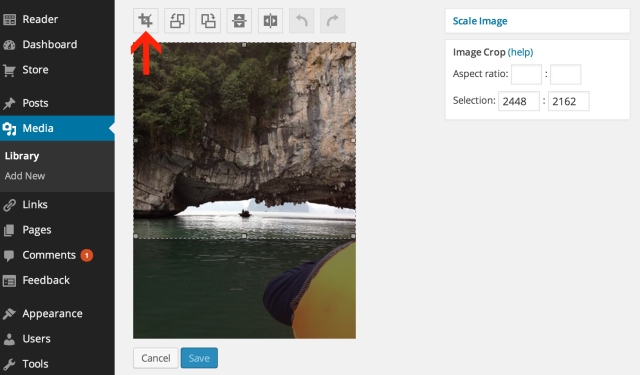
The Media Manager in your WordPress.com dashboard.
As illustrated above, cropping allows you to control what’s in the frame, and it not only lets you “clean up” a shot (remove a lamp post or power lines in a street shot or cut out your ex-boyfriend), but also allows you to show your point of view and your own distinct way of looking at the world.
Consider this shot of a tiled floor, which I took over the weekend at a hotel in Santo Domingo in the Dominican Republic:
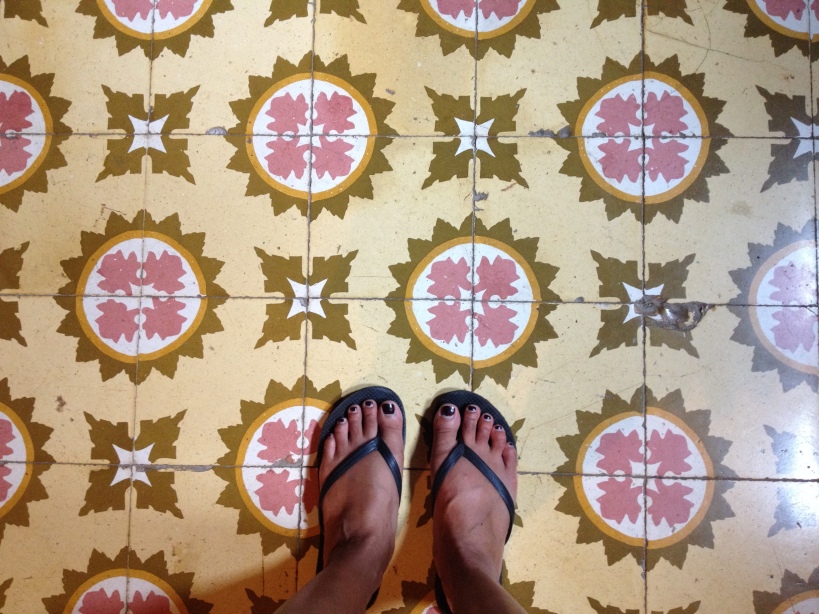
Original version.
I thought placing my feet off-center and along the edge of the frame (and rotating the image, which you can also do in your Media Manager) would make this mundane shot a bit more fun and different:
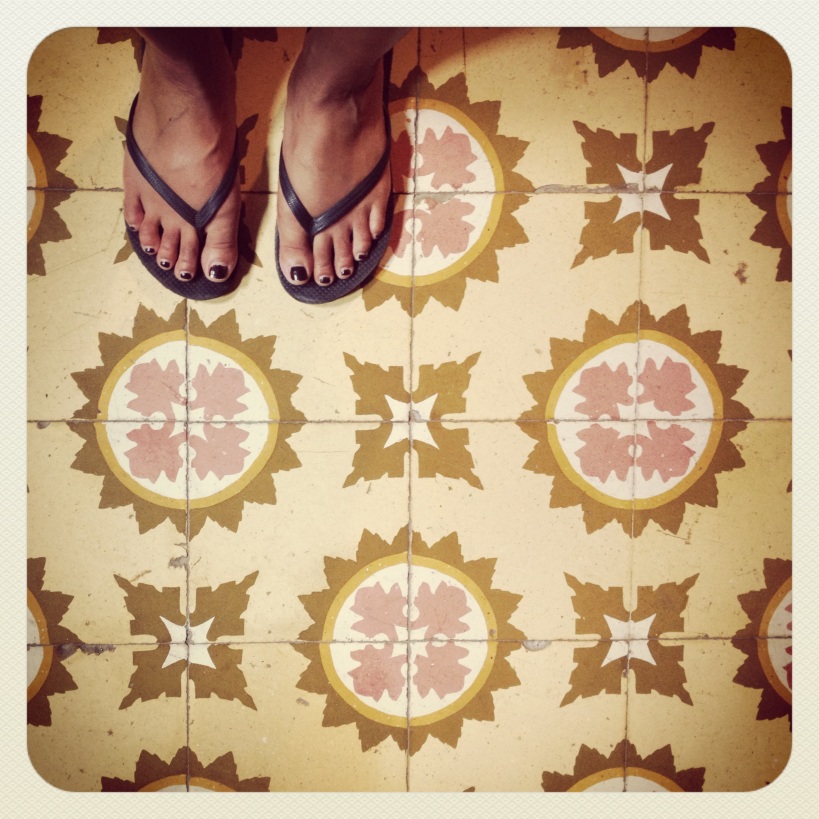
Cropped, rotated, and instagrammed version.
Other tips to consider:
- There’s no right or wrong way to crop — to begin experimenting, shave off just one side of an image, then continue by cutting the other sides. You’ll often find you don’t have to crop all four sides to create the look you want.
- Consider whether a shot looks better in portrait or landscape orientation (revisit Jeff Sinon’s tips on finding the best shot, if needed). If you want to change the orientation, use the cropping tool to change the dimensions of the image.
- Remember basic composition rules, such as the Rule of Thirds. You can control where you’d like an object to appear in a frame by cropping one or more borders of your image.
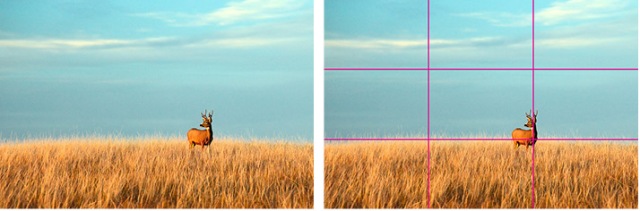
Image via http://www.shutterstock.com
- Avoid cropping too much! You can create visual harmony by placing an object, like the deer above, where the horizontal and vertical lines intersect, but be careful with objects that are closer to the edge of a frame, which might make an image lopsided, as shown on the right with the placement of the red bus:


- That said, you may want to crop a certain way to create a specific effect — sometimes extreme, deliberate crops produce interesting, dynamic compositions. So remember, these are merely guidelines.
What other tips do you have for successfully cropping an image?
What other editing tasks would you like to learn about?
Currently blogless? You’re a click away from sharing your story.
Create your blog at WordPress.com


Personally, I like the picture to the left.
LikeLike
I do, too. Perhaps illustrates some things are better left alone 🙂
LikeLike
There’s no right way to do it, you mean?
LikeLike
That’s her point. If you read what’s written she actually uses the picture on the right to illustrate why you should “avoid cropping too much”.
LikeLike
valuable reminders
for better
visual stories 🙂
LikeLike
I’ve been using wordpress a lot and I didn’t know about this tip. Thank you
LikeLike
You need to think of the external shape too, depending on how it is to fit into the blog. Would it be better thin & stretching across the width of the blog? Should it have a caption/border/background? A square is the most stable and static shape there is so an image of rough waves for example will be held tighter in such a shape. Strong diagonals in an image can pull they eye into the image, enhancing the involvement of the viewer. Images can also act as a contrapunto to the statements in the blog, enhancing or enlarging on the sentiments expressed.
I always think of what the editor of the London ‘Times’ said – that ‘an image is worth 2,000 words’.
She also said ‘no picture – no story’….
So I always build my stories around pictures at http://Goffgoofsoff.com
LikeLike
Helpful insights — thank you for sharing this with our readers.
LikeLike
You also need to be aware of how many pixels you’re losing when you crop. If you ever want to be able to get a large print of the image you need to keep as many as possible. The first image is losing way too many pixels to be good for anything other than instagram or facebook. This is why getting the shot right (or at least relatively close to right) in camera is still important!
LikeLike
LikeLike
Great crop…
LikeLike
and save the cropped image under another name – always keep the original in its oiriginal form. Good point Steve
LikeLike
Absolutely — save the original versions. You never know when you’ll need it again, and I don’t know how many times I’ve not done this and been stuck with an image that becomes unusable.
LikeLike
Also a good point, Patrick. And another good reason to shoot in RAW – at least with Canon, my ‘crops’ are saved in the RAW file without actually removing any of the information – that only happens at the point you export it to a jpg.
LikeLike
I always “save as” or make a copy to make changes in my photo. You should do that before importing into wordpress if you are going to do so in media manger.
LikeLike
Loved the underground cave/lake pictures.
LikeLike
Some great info there, thanks! I didn’t realise you could edit images in the media library.
LikeLike
I always edit my photos outside of WordPress and didn’t realize that simple edits could be made in Media Manager. Thanks for the tip!
LikeLike
I often take photographs with the idea that I will crop them to show the relationship between the subjects in the image as opposed to just the subjects. By cropping out the outer edges of the subjects to where you are left with a bit of the subjects and the space between them. This hi-lites the subjects and their relationships to one another.
Good post on cropping btw,
best,
maureen
LikeLike
Great tips! I do like the picture on the left for the last set though.
LikeLike
Hi Cheri
I was drawn to this post because of the red bus pic. I’m a big fan of cropping, but I was going to say I preferred the uncropped version – and – you beat me to it. I often crop, and then take back to the original and use that in the end. Mainly, I crop to get rid of superfluities, your Halong Bay pic is a perfect example of that.
I learned to crop using right angled corners on actual prints, bit difficult to do on computers though, but it did give you an idea for the impact a photo would have.
The Hanoi bus pic is such a good example of how sometimes foreground and space should be left it a pic. Truth is, for that one, there’s nothing to crop to highlight, so best left as a traffic and building shot.
Feet shot? Again I think I like the original, less intrusive and gives the idea of stepping forward. The other is more in my face. But how we manage our photos is all down to individual taste.
Interesting post. Before and after cropped images are always fascinating.
LikeLike
LikeLike
Cropping i do many times whenever i don’t like certain part of picture exposed. Now i realise its essential to good blog appearance.
LikeLike
I’m a compulsive cropper. I just can’t slow down enough to get things nicely lined up. Plus my camera can’t take a straight horizon. It looks straight in the viewfinder, but its never straight in the image.
I enjoy seeing what I can find in an image by severly cropping. Steve (above) is right about loosing pixels, but sometimes there’s an interesting image in there if you loose the expectation that photographs have to be crystal sharp. Check out this severly cropped image I took of autumn; post includes the originals so you can see the difference.
LikeLike
Informative. Thank you!
LikeLike
The article was most helpful. Thank you, guys! 🙂
LikeLike
I like it because of its appearence
LikeLike
The crop really helped the top picture. The last one you change where the eye is drawn. The original photo draws my eyes you to the traffic below the bus. The photo on the right draws my eyes to the street.
LikeLike
I always have problems adjusting and editing the pictures.Thanks for the valuable info you’ve shared.
LikeLike
Great post
thanks for sharing
LikeLike
Helpful post. I always use Pixlr when cropping/resizing/editing the images I use on my blog and it truly gives a more ‘professional’ feel to the page.
LikeLike
hi can you please view my blog, like it and add a comment the one on Miley Cyrus.
LikeLike
I didn’t read all the comments, but I am thankful of your suggestions. I love photography as much as I love to write. So every little bit of advice is so much appreciated. Love it here.
LikeLike
pixlr express is my favourite editing tool – it’s like a super easy version of photo shop and allows you to do so many things with your photos in a really easy way.
LikeLike
I tried cropping and I could do it! So excited at how great the directions were that I could really do it. And what a difference it made in the photo. Thanks so much!
LikeLike
Great info! I might also urge shutterbugs to consider necessary cropping in the resolution they choose for the image; minimal cropping requires lower pixel density, while radical cropping requires the highest possible pixel density. Also, printing hard copy of a photo requires much, much higher pixel density, while simply posting one on a blog isn’t all that critical, even though composition and color-balance still matter.
LikeLike
Good to know I can crop in WordPress. Here are my copped images: http://lumar1298.wordpress.com/2014/01/08/cropping-images/
LikeLike
A very interesting post with valuable tips especially for creatively cropping photos. Will put much of this info to use in the near future. Thanks a lot for sharing!
LikeLike
Good information. I have done some photograph and digital video. Your suggestions are textbook. Thanks!
LikeLike