A quick tutorial on enhancing your site with widgets.

Getting Started: When logged into your account, click on My Site → Customize → Widgets. Here, you can select the section of your site where you’d like to add a widget, click on Add a Widget, and search for and activate an assortment of widgets.
The widgets on WordPress.com can help you personalize your blog or website. Let’s zoom in on several ways to enhance your site’s sidebar or footer with some of the most popular ones.
Personalize widget titles
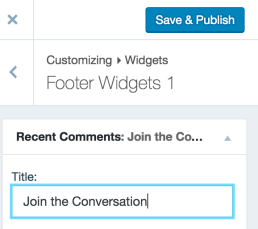 You can create custom titles for many widgets. If you have lively discussions on your blog, for example, title the Recent Comments Widget with “Join the Conversation.” Or if you want a more playful title for your Twitter Widget, consider something like “What the Birds are Chirping,” “Thinking Out Loud,” or “Momentary Musings.”
Also, be consistent with your blog’s theme. If you have a food blog focused on desserts, create widget titles related to baking and cooking. How about “Sweet Tweets” for your Twitter Widget? Or “What’s Cooking?” for your Calendar or Upcoming Events widgets? You can even spice up the seemingly mundane Search Widget with “Search the Cupboard.”
Get creative with text widgets
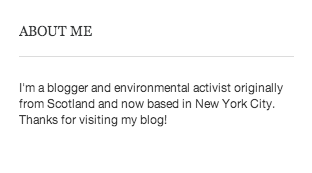 Text Widgets are simple but versatile. With a Text Widget, you can insert text into your sidebar. An “About Me” section at the top of a sidebar is common: a welcome message, a short version of your bio, or an elevator pitch of your site.
A clear and simple example of a Text Widget is on the left. But you can do so much more with a Text Widget: display a combination of text, links, images, and HTML to make your sidebar colorful and more graphic.
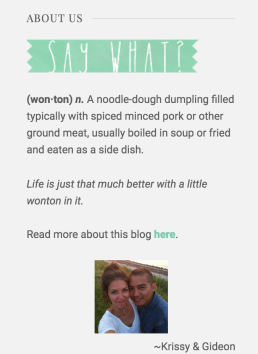
Wild Wonton Text Widget
Let’s take a peek at the travel blog Wild Wonton. Its background is clean and white, with splashes of sage green in the header, tagline, and sidebar. Krissy and Gideon spruce up their sidebar with a Text Widget: they use an image — a small, green “Say What?” banner — in place of a widget title; place some of the text in bold and italics for emphasis; and end with a friendly sign-off with their names.
The copy itself is also clever: a definition of “wonton,” which playfully refers to the name of the blog as well as its focus on travel and living abroad in China.
So, how did they create this Text Widget? In the Customizer (My Site → Customize → Widgets), they selected the section of their site where they wanted to place the widget (sidebar), clicked on Add a Widget, and searched for and selected the Text Widget (“Text”). Then, they inserted an image at the top, some text about wontons, a link to their About page, and a bit of HTML to create the effect:

If you know basic HTML, play around with the Text Widget — it’s a flexible and powerful feature. For those who want a primer, poke around on an HTML tutorial.
Use the “image grid” option

Top Posts & Pages Widget
Some widgets, including the Top Posts & Pages and Blogs I Follow widgets, add nice visual touches to your sidebar. The Top Posts & Pages Widget showcases your most viewed posts and pages. You can display it as a simple text list, an image list (post titles with images, as seen on Vincent Mars’ blog, Boy with a Hat), or an image grid, as shown to the right.
To display the Top Posts & Pages Widget:
- In your Customizer (My Site → Customize → Widgets), select the section of your site where you’d like to add the widget, click on Add a Widget, and search for and select “Top Posts & Pages.”
- Specify the number of posts to show (for example, “6”).
- Order the posts by likes or views.
- Under “Display as,” be sure to choose “Image Grid,” which activates the display of square images, as seen on the right.

Blogs I Follow Widget
The Blogs I Follow Widget works similarly and displays linked images for the blogs you follow:
- In your Customizer (My Site → Customize → Widgets), select the section of your site where you’d like to add the widget, click on Add a Widget, and search for and select “Blogs I Follow.”
- Give it a fun title (“Reading Material,” “Stuff I Like,” “My Favorites,” “Fellow WordPressers,” etc.).
- Select the number of blogs to display (up to 50).
- Choose “Grid” under “Display as.”
Once saved, you’ll see an image grid of gravatars from the blogs you follow, similar to the one on the left. The widget not only enhances your blog visually but offers a glimpse into the community you’ve built on WordPress.com.
Edit your images for a different effect
When activated, the Image Widget displays an image in your sidebar. If you’d like to spruce up the look of your images but don’t have much Photoshop experience, edit an image by changing its shape or adding a border. Here’s how:

Image Widget
Change an image’s shape: A circular image, which you’ll see built into themes like Spun, is a playful alternative to square or rectangle-shaped images. It’s pretty simple to create a custom circle image with a photo editor like PicMonkey (use the “Rounded Corners” option under the “Frames” tool). Then, follow the steps to upload the image and create the Image Widget.
Add a border: Another way to transform an image is by adding a border. PicMonkey and Pixlr offer the option to add a border to an image, as well as other effects (a vintage Polaroid frame, frayed or burnt edges, a film strip effect, etc.). Depending on the look and feel of your blog, there may be a particular visual effect that’s appropriate.
If you’re not sure what kind of images to use, read this post on visual identity. If you’d like, continue on with “Widgets 201,” “Widgets 301,” and a more in-depth tutorial on creating a custom Image Widget for non-designers.
Currently blogless? You’re a click away from sharing your story.
Create your blog at WordPress.com


I love using widgets and put one up on my blog today linking the Go Red for Women icon to another site I set up for donations.
Picmonkey rocks, but I have never used the rounded corners feature. So cool!
Thanks for all the info!
LikeLiked by 1 person
Out of all the widgets I use I find top posts, twitter feed, and recent comments really useful. However, that said, it’s amazing how many blogs I look at and they don’t have a subscribe by email option as well as RSS.
LikeLike
Yes, I find the “subscribe by email” option super helpful for those who aren’t WP.com users.
LikeLike
I use image grid. But recently one image quit appearing in the grid. It used to be there but no longer shows. If I switch to image list, it shows up again.
LikeLike
What a great tips! Especially for the rounded corner of photo tips.Thanks for the info Cheri 🙂
LikeLike
I’d like to see a tutorial on the new widget that uses iCalendars for marking events. I did some research & couldn’t find a detailed explanation. Do I need a Mac? Could I simply use an iPhone + iCloud?
Anyway, that’s my only request. Great post. 🙂
LikeLike
I found this Upcoming Events widget support page. Also, check the widget support forum if you want further assistance or to see responses to frequently asked questions.
Thanks for the suggestion for a future tutorial 🙂
LikeLike
Thank you & you’re quite welcome. 🙂
LikeLike
Perfect tips, thanks. I just created some logo_images for my blog and I have them at widgets, but I am not able to give away the white frame from it – how can I do it? and also I would prefer to have them as image grid. Is there any chance how to make it? thanks
LikeLike
Are you referring to your “Prague Towers” and “Prague Christmas” images at the bottom? I’m not positive, but I think the white border is specific to your theme, Koi. As for an image grid, do you mean you’d like the images side by side?
LikeLike
Yes, exactly, I would love to have them side by side. When there willl be more – maybe – I would love them like a grid, let’s say three in one row… is it possible?
About the white frame, it is sometimes there (if caption is used) and sometimes not (withouf caption or alignment), but in the widget it is always there …
thanks for help
LikeLike
Hi again, @Praguebykaty — I’ll email you. Yes, it’s possible; you can insert HTML into a Text Widget to create this effect. As for the white frame, it could be that your theme, Koi, includes the white frame around an image in an Image Widget. I’ll send you a suggestion you can use for a Text Widget to create the grid you’re envisioning. (Another option, too, is creating a collage of images in a photo editor first and uploading that into an Image Widget.)
LikeLike
More great tips, looks like I need to look at my site again
LikeLike
These are wonderful tips. Thank you! I need all the help I can get. 🙂
LikeLike
Being fairly new to the blogging world, this help is wonderful. I appreciate it so very, very much and would love to see more about making our blogs interesting in sight as well as words. Thanks so very much!!!
LikeLike
Additional beautiful tips! So much creativity can emerge from these. Welldone!
LikeLike
These tips are exactly what I have been looking for as I try to personalize my new blog. Thanks for the great ideas and inspiration, I have a lot to learn!
LikeLike
Great tips! Thanks for taking the time.
LikeLike
Can’t do the roundies without pro help, but look at my redo of tag and widgets and see what you think, please.
http://katharinetrauger.wordpress.com/
LikeLike
Like the “You CAN go beyond this page” text. The images under “Cool faves” look nice, too.
LikeLike
Thanks, Cheri! 🙂
LikeLike
I have a question: how can I arrange icons on the same line when using text widget?
thanks for the tip
LikeLike
Thank you for the additional helpful information.
I have become a widget Junkie! I seem to crave wanting to add, amend or re-arrange my widgets. I would like to find out though, is there a way that you can add more than one image on the image widget?
http://mychroniclife.wordpress.com
LikeLike
I like this very well. I’ve revamped my blog recently and was looking for ways to get a little more creative. I think this will help greatly!
Thank you!
LikeLike
This article helped me tremendously! Thanks for the info.
LikeLike
I just tried a picmonkey and it was very easy to use. I created an example image and posted it on my blog. Thought it looked rather large, but it resized well. (Check the sample image at this link:
http://shadozablog.wordpress.com/2013/01/31/picmonkey-collage-jpg/
There was several options that would have made great headers for a blog. The images came be grabbed off your PC by pick and click method. Rearranging the images after choosing a frame setting is as simple as sliding one image to a new spot.
LikeLike
Thanks so much for the wonderful tips and yes I am very interested in more suggestions. Thanks again. 🙂 Carol
LikeLike
Is there a way to randomize the “Blogs I Follow” images? It looks like the default is my most recent follows and never changes.
LikeLike
Yep, that’s the default — blogs are listed in reverse order, so when you follow something new, it will appear at the top of the list. Currently, there isn’t a way to randomize.
LikeLike
HI–Since changing my theme I have been unable to get the Facebook widget to come over correctly. I paste the URL as previously but on my blog home page it looks like a big empty rectangle. I have tried multiple times over multiple days but no luck. Thoughts?
LikeLike
Not sure, though I’ve read that from time to time there may be a disconnect between a WordPress.com blog and a Facebook page account and disconnecting/deleting and trying again sometimes helps. Here’s the support page for Facebook Integration. You can try searching for common Facebook issues in the widget forum or post for additional help as well.
LikeLike
I’m having trouble with my Facebook widget too. It works fine, but there is extra white space beneath it that I can’t get rid of. The only support forum thread I could find about this was over a year old (https://wordpress.com/forums/topic/white-space-beneath-facebook-widget?replies=10). The trick posted there didn’t work for me. For now I’m just living with the white space because I really want that Facebook button!
Thanks for a great article and sidebar ideas!
LikeLike
Thanks this was a great article!!! I especially appreciate the suggestions to use Pixer and picmonkey. I think I’ll be using that soon!!!
LikeLike
Though I been reading this site for months, this is the first post that got me excited enough to post a comment. Great article – it highlighted several things I didn’t even know WordPress could do! The Image Grid especially was very cool. My one wish now was for WordPress.com to create an Instagram widget. I’ve seen people say you can do this on WordPress.org but not on .com … 😦
LikeLike
While there currently isn’t an Instagram widget in your dashboard, one alternative is embedding an image from Instagram. The post I linked to describes posting the URL of an Instagram image to a post/page, but you can specify the width of an image and make it smaller (you’ll see this if you scroll down the post). In other words, you could insert this in a Text Widget and display a smaller version of an image in your sidebar.
LikeLike
Thanks for your reply, I didn’t know about embedding Instagram photos! I tried it out here for my valentine’s post (http://jelliefishie.wordpress.com/2013/02/03/happy-valentines-day-at-palo-santo-restaurant-review/), but there’s definitely some features lacking that WordPress.com is normally able to do with regular photos…for instance, being able to change alignment on the pictures, and controlling the size. There seems to be either just really small or really big, even with futzing around with the pixel sizes, and I can’t caption it.
However, in my original comment I was thinking more of an Instagram widget that’s exactly like the Flickr one – pictures I post on Instagram immediately show up on the “feed” automatically. With embedding, it’s definitely nice that I can use the photos from instagram.com … but I have to do it manually in my posts, and it’s better to just take the URL of it from something like statigr.am and use the “add media” button…this way I can control size more easily, plus add caption and change the alignment of the photo. Embedding in this case is not an alternative to have an auto-updating feed like the Flickr widget, and at the moment is not as good as simply adding the image URL like normal.
LikeLike
Hey can you guide me with del.icio.us?
LikeLike
Here’s the support page for the Delicious Widget. If you have a specific question, feel free to post in the widget support forum!
LikeLike
Thanks for the link to the HTML tutorial. I really like what you’re doing here. Thanks for your hard work putting all this together; it’s extremely helpful.
LikeLike
Hi.
I use the Spectrum theme on my blog Serenely Rapt. I recently created an account with DMCA to help protect my content. DMCA advises users to add their html code in the footer of the blog which will ensure protection to all pages automatically. Unfortunately, Spectrum has no footer widget area. For the time being, I have added the html code to the top of my sidebar but I’d prefer putting it in the footer as advised.
How can I get around this? Can you help?
Dagny
LikeLike
If you stay with Spectrum, an alternative is moving that text widget to the very bottom of the sidebar, underneath your tags. Or place it next to the creative commons text widget, which seems appropriate.
Feel free to post for further assistance in the themes support forum if you have Spectrum-specific questions. A possibility *may* be to use custom CSS on your blog, which is an upgrade, but I’m not sure that’s the best option.
LikeLike
Thank you for the response. I’ll place the widget at the bottom of the sidebar and keep my fingers crossed. 🙂
LikeLike
I love the selection of widgets we have… This was fun. TY! 🙂
LikeLike
Reblogged this on Catalina Albu Fotograf.
LikeLike
I made some changes to my widgets based on this post, so thank you. I was especially surprised by the fact that the Text widget allows for basic HTML. Feel free to check out what I did and let me know what you think.
LikeLike
The grid in your Blogs I Follow list looks nice — spruces up the sidebar a bit. And yes, the Text Widget is very flexible — you can do a lot with it, and that’s cool that you’ve changed the color of the text. Glad this post was helpful.
LikeLike
Thank you for this post. It made a big difference to my blog. Really enjoyed using the widgets!
LikeLike